If you have ever felt a sharp, electric pain shoot from your lower back down your leg, you already know how sciatica can ruin an ordinary day. Sitting hurts, standing hurts, and getting down on a yoga mat feels almost impossible. That is exactly why I started exploring chair yoga for sciatica, and it became one of the few things I could do even on my worst days.
In this guide to chair yoga for sciatica I will share the seven poses I actually use, how I do each one, the mistakes I made along the way, the precautions you should not skip, and honest answers to the questions people ask me most. Everything here comes from my own practice and trial and error, so please treat it as shared experience and not as medical advice.
What Is Sciatica, and Why Does Sitting Make It Worse?
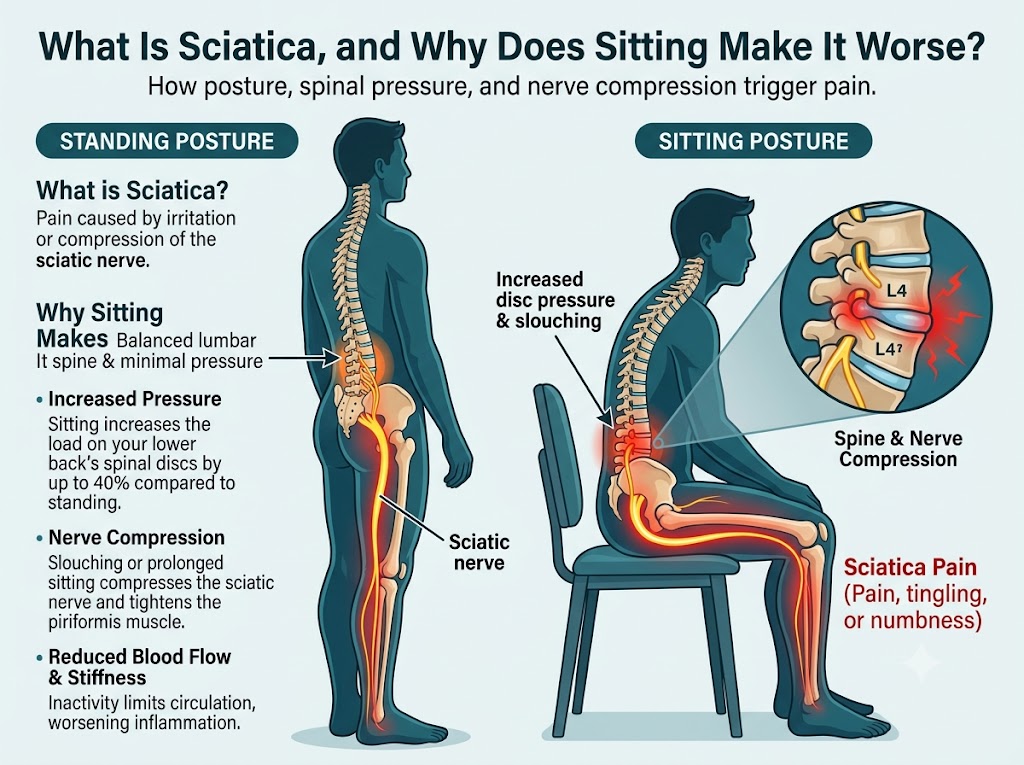
Sciatica is pain that travels along the sciatic nerve, which runs from your lower back through your hips and buttocks and down each leg. It usually shows up on one side. For many people it feels like a burning, tingling or shooting pain, and sometimes there is numbness in the leg or foot. This is why chair yoga for sciatica focuses on gentle hip and spine movement rather than deep, aggressive stretching.
The frustrating part is that long hours in a chair can make it worse. When you sit for hours, your hips tighten, your hamstrings shorten and the muscles around the lower spine get stiff. A tight muscle deep in the buttock, called the piriformis, can also press on the nerve in some people. I spent most of my workdays sitting, so my pain flared up almost every afternoon.
Why I Started Practicing Chair Yoga for Sciatica
For months I avoided any stretching because floor poses made my leg pain spike. A friend suggested I try a chair instead. I was doubtful at first, because I assumed yoga on a chair would be too easy to matter.
I was wrong. Within the first couple of weeks of doing chair yoga for sciatica for ten minutes a day, I noticed that my afternoon stiffness was less sharp and I could sit through meetings with fewer breaks. It did not cure anything, and some days were still bad. But it gave me something gentle and safe to do, and that mattered a lot.
Here is why I think this approach works for many people:
- The chair supports your body weight, so you can stretch without straining your back.
- Seated movements are low impact and easier to control than standing or floor poses.
- You can practice at your desk, at home or even while watching TV.
- It encourages slow breathing, which helps the body relax around the painful area.
Before You Begin: Setting Up Your Chair
A little preparation makes the poses safer and more comfortable.
- Use a sturdy chair without wheels and without armrests that get in the way.
- Sit with both feet flat on the floor, about hip-width apart.
- Sit near the front edge of the seat, but make sure the chair is stable.
- Keep your spine tall without forcing it.
- Wear loose, comfortable clothes.
Move slowly, breathe through your nose and stop at the first sign of sharp pain. Mild stretching is fine. Sharp, shooting or tingling pain is your signal to back off.
7 Seated Poses I Use for Sciatica
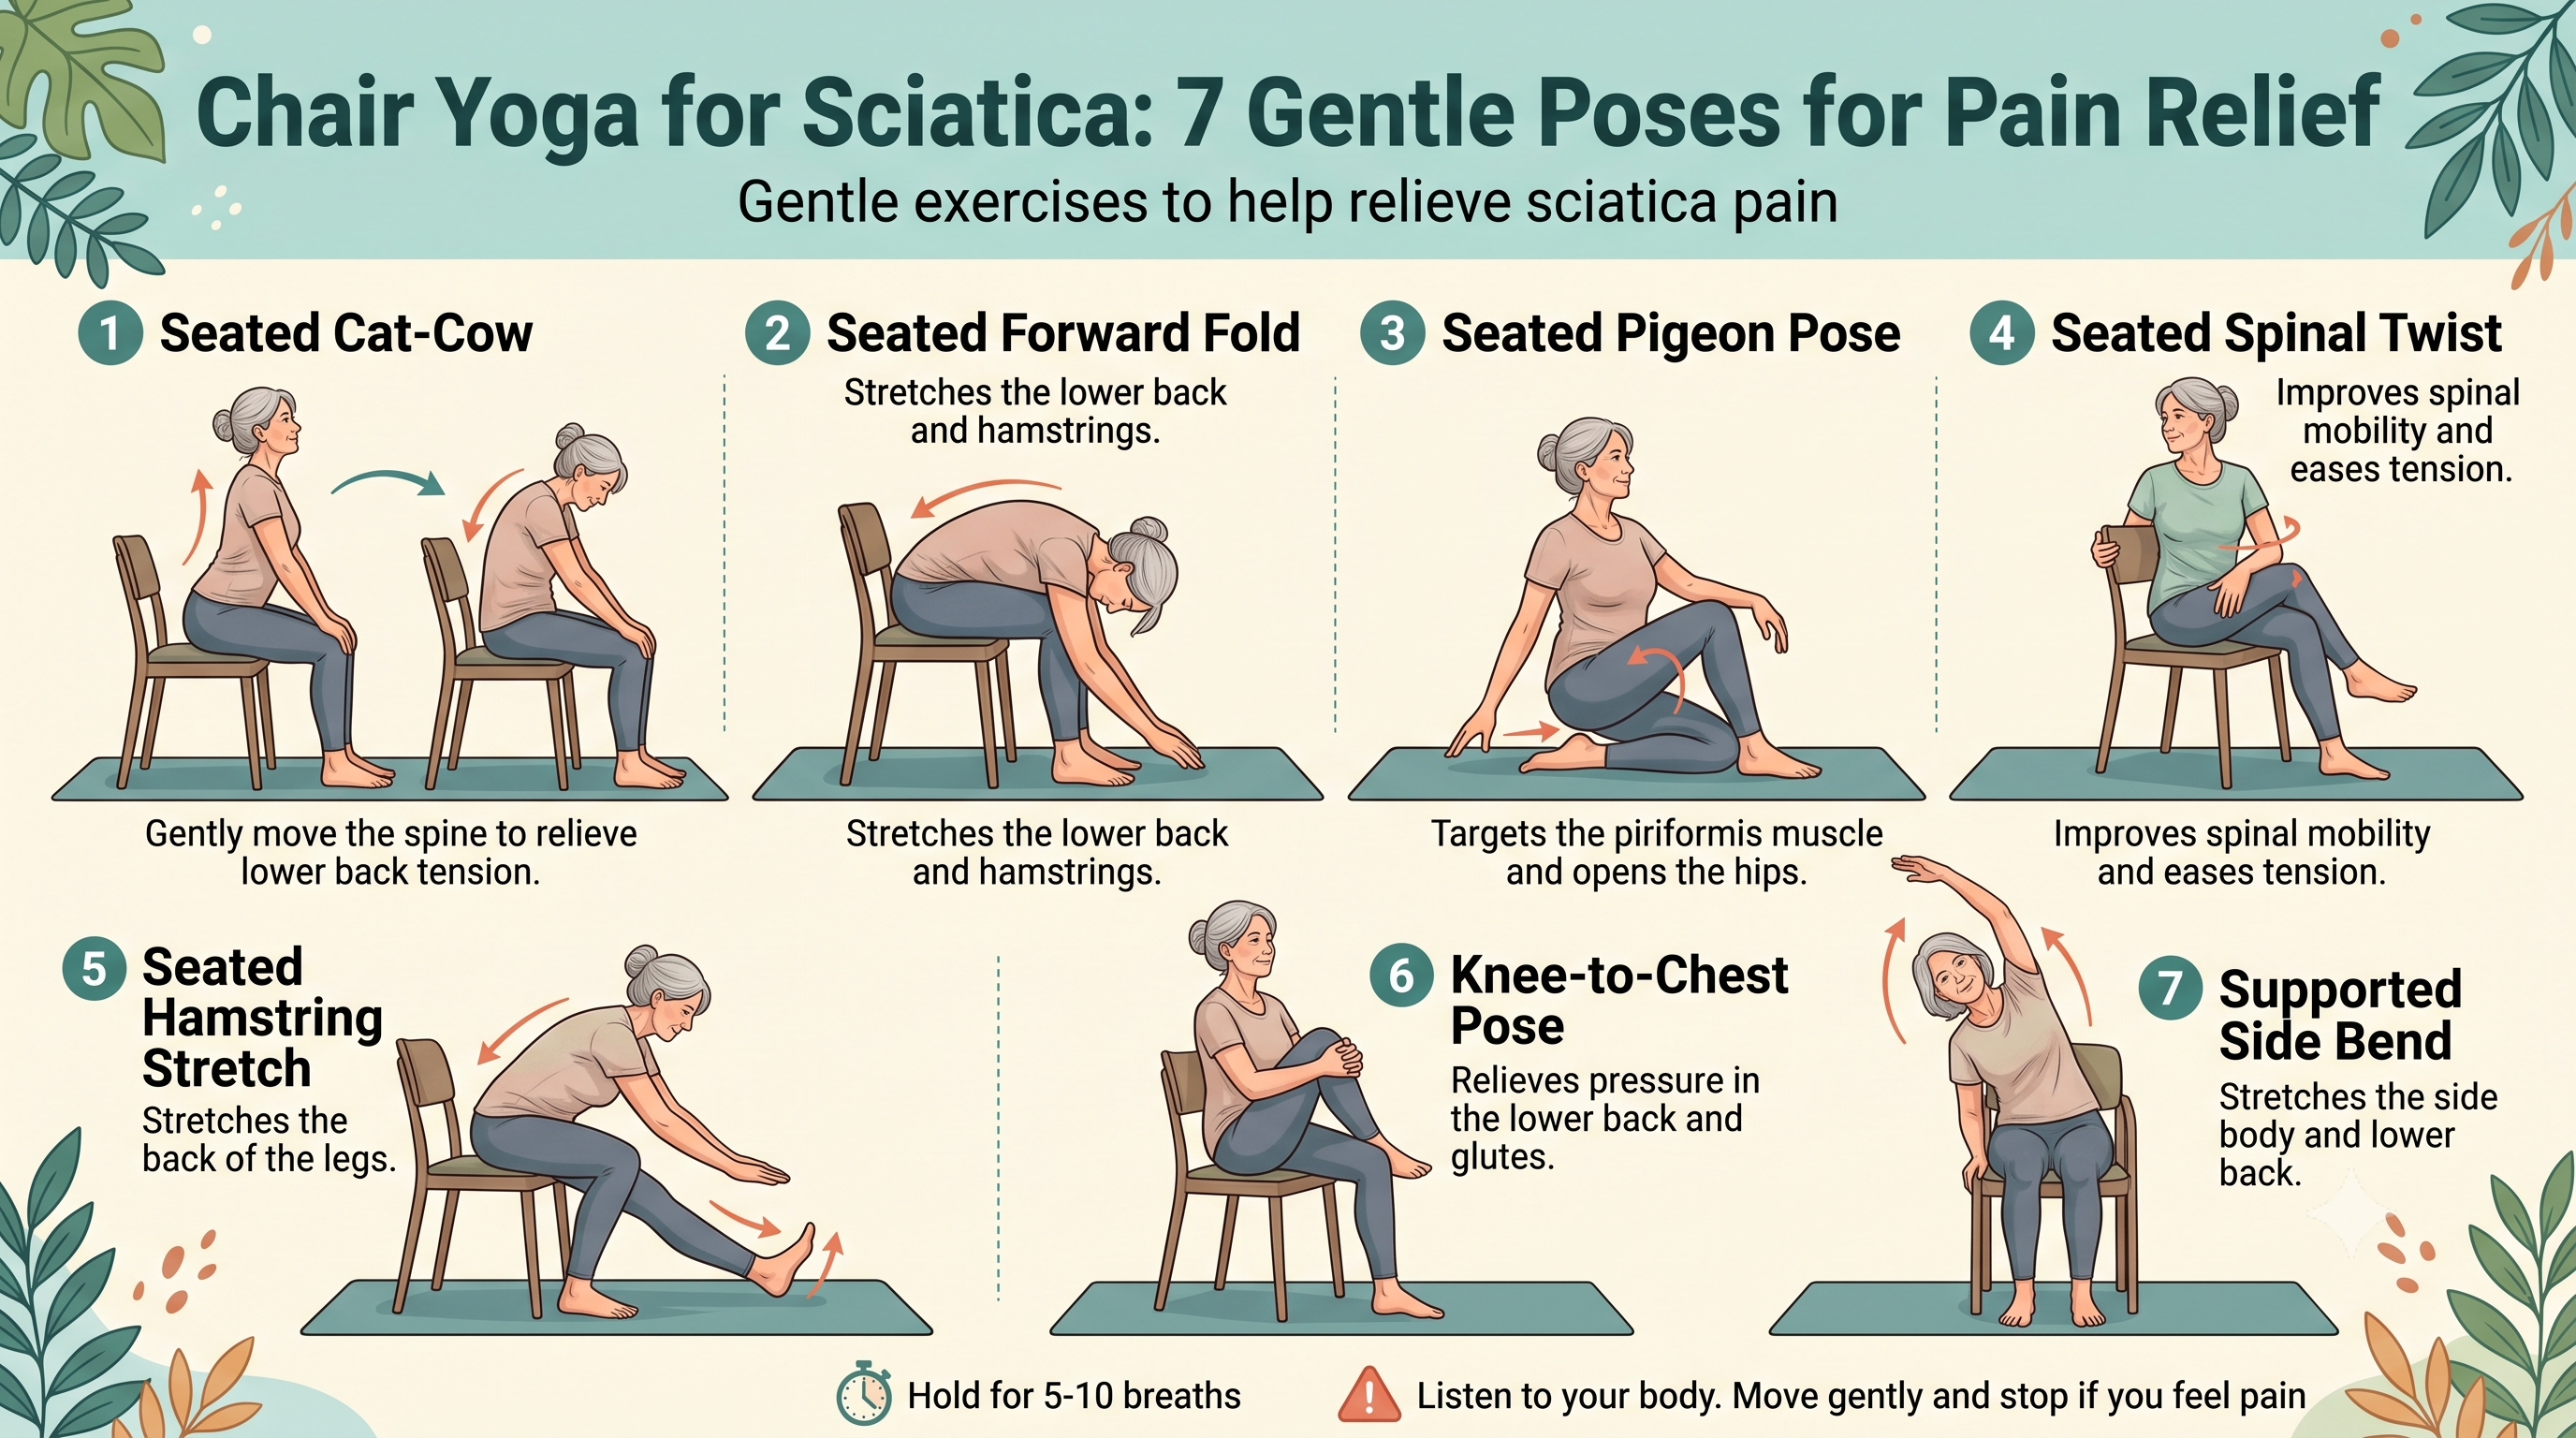
Here is my complete chair yoga for sciatica routine, in the order I usually do it.
1. Seated Cat-Cow (Gentle Spinal Movement)
This is the pose I start with every time because it warms up the spine without any pressure.
How to do it:
- Place your hands on your knees.
- Inhale, gently lift your chest and look slightly forward.
- Exhale, round your back and drop your chin toward your chest.
- Repeat slowly for 8 to 10 rounds.
My tip: Keep the movement small. When I first tried it, I arched too far and my pain flared. A small, smooth motion works much better.
2. Seated Ankle-to-Knee Stretch (Seated Pigeon)
This is the pose most people mention when they talk about seated yoga for sciatica, because it opens the hip and the piriformis area.
How to do it:
- Sit tall and cross your right ankle over your left knee.
- Keep your right foot flexed to protect the knee.
- Keep your spine long, and if you feel a comfortable stretch, stay here.
- If you want more, hinge forward slightly from the hips, not the waist.
- Hold for 30 seconds, breathing slowly, then switch sides.
My tip: Do not push the knee down with your hand. Let gravity and your breath do the work. Forcing it was my biggest early mistake.
3. Seated Forward Fold
How to do it:
- Sit with your feet flat and slightly apart.
- Exhale and slowly fold forward, letting your arms hang or rest on your thighs.
- Let your head and neck relax.
- Hold for 5 slow breaths, then roll up one vertebra at a time.
My tip: If a deep fold increases leg pain, only fold halfway. Rounding too deeply never worked for me on flare-up days.
4. Seated Spinal Twist
How to do it:
- Sit tall with both feet on the floor.
- Place your right hand on your left knee and your left hand on the back of the chair.
- Inhale to lengthen, exhale to turn gently to the left.
- Hold for 5 breaths, then switch sides.
My tip: Twist from the middle of your back, not by yanking with your arms. A gentle twist should feel relaxing, not tight.
5. Seated Hamstring Stretch
Tight hamstrings often go hand in hand with lower back and leg discomfort.
How to do it:
- Sit on the front edge of the chair and extend your right leg out with the heel on the floor and toes pointing up.
- Keep your back straight and hinge slightly forward until you feel a mild stretch behind the thigh.
- Hold for 30 seconds and switch legs.
My tip: Keep your knee slightly soft, not locked. I used to overstretch here and it left my leg feeling worse.
6. Seated Knee-to-Chest Hug
How to do it:
- Sit tall and lift your right knee toward your chest.
- Clasp your hands around the shin or under the thigh.
- Hold for 5 slow breaths and switch sides.
My tip: If hugging the knee close feels too intense, hold it a little away from your chest. Comfort comes first.
7. Seated Side Bend
How to do it:
- Sit tall and raise your right arm overhead.
- Gently bend to the left, keeping both hips firmly on the seat.
- Hold for 3 to 5 breaths and switch sides.
My tip: Keep your chest open and avoid leaning forward. This one is great for releasing tension along the sides of the lower back.
How Often Should You Practice?
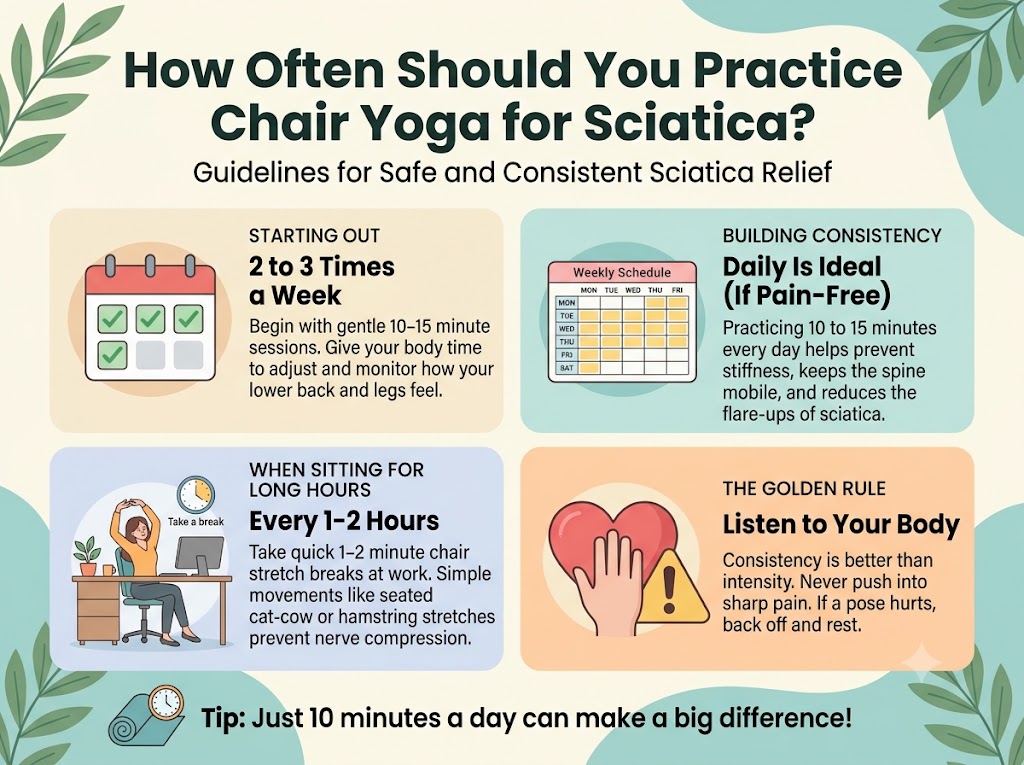
When it comes to chair yoga for sciatica, this is what worked for me, but everyone’s body is different.
- Aim for 10 to 15 minutes once a day, or two shorter sessions.
- Try a quick 5-minute round of sciatica exercises while sitting during work breaks.
- Be consistent. Gentle daily practice helped me more than one long session once in a while.
- Rest on days when your pain is higher than usual.
My Practical Tips for Better Results
- Warm up first. Start with cat-cow before deeper hip stretches.
- Breathe slowly. Long exhales help the body let go of tension.
- Never bounce. Hold stretches steadily.
- Stand up and walk every 30 to 45 minutes. No amount of stretching replaces moving around during a long workday.
- Check your sitting posture. Keep your hips slightly above your knees and support your lower back.
- Use a cushion if needed. A firm cushion can make long sitting more comfortable.
- Track your progress. I wrote short notes on which poses felt good and which did not. This helped me adjust.
- Be patient. Progress was slow and uneven for me, and that is normal with chair yoga for sciatica.
Precautions You Should Not Ignore
Safety matters more than any pose, and chair yoga for sciatica is no exception. Please read these carefully.
- Talk to your doctor first. Sciatica can have different causes, and a doctor or physiotherapist can tell you what is safe for you.
- Stop if pain increases. Sharp, shooting, burning or worsening pain means you should stop the pose.
- Do not force any stretch. Pain is not a sign of progress.
- Avoid deep forward folds or strong twists if they trigger leg symptoms.
- Seek urgent medical help if you have sudden severe pain, weakness in the leg, numbness around the groin or inner thighs, or trouble controlling your bladder or bowels. These can be warning signs of a serious condition.
- Pregnant, recovering from surgery, or have other health conditions? Get professional guidance before starting.
- Use a stable chair and place it against a wall if you worry about slipping.
Frequently Asked Questions
Is chair yoga for sciatica really effective?
Many people find it helpful for easing stiffness and tension, and it is a gentle, low-impact option. Results vary, and it works best alongside medical advice, movement and good posture. It is not a guaranteed cure.
How long does it take to see results?
With chair yoga for sciatica, I noticed small changes within two to three weeks of daily practice. Some people feel relief sooner, and others need longer. Keep your expectations realistic.
Can I do these poses at my desk?
Yes, chair yoga for sciatica fits easily into a workday if you have a sturdy chair and some space. Poses like the seated twist, side bend and knee hug are easy to do at work. Just make sure your chair does not roll.
Which pose helps most with sciatica?
Many people favor the seated ankle-to-knee stretch because it targets the hips and the piriformis area. That said, the best pose is whichever one feels comfortable and safe for you.
Is it safe for seniors?
Chair yoga for sciatica is often recommended as a gentle option for older adults because the chair gives support. Seniors should still check with a doctor first and move slowly.
Should I do these poses during a severe flare-up?
If the pain is intense, rest and speak to your doctor. On milder days, very gentle movements like cat-cow may feel fine, but listen to your body.
Can sitting all day cause sciatica?
Prolonged sitting can contribute to stiffness and make existing sciatica worse. Taking regular movement breaks and stretching can help reduce the strain.
Final Thoughts
Living with sciatica taught me to respect my body’s limits, and chair yoga for sciatica gave me a safe place to start moving again. If you are hesitant about floor-based exercise, this gentle approach might be a good first step. Start small, move slowly, stay consistent and always put safety first.
If you have your own experience with seated yoga for sciatica, I would love to hear about it in the comments. And if you found this guide useful, you may also enjoy my posts on seated cat cow pose and chair yoga for anxiety and stress relief at your desk.
Disclaimer: This article is for general information and shares personal experience. It is not medical advice. Please consult a qualified healthcare professional before starting any new exercise routine, especially if you have pain, numbness or a diagnosed medical condition.