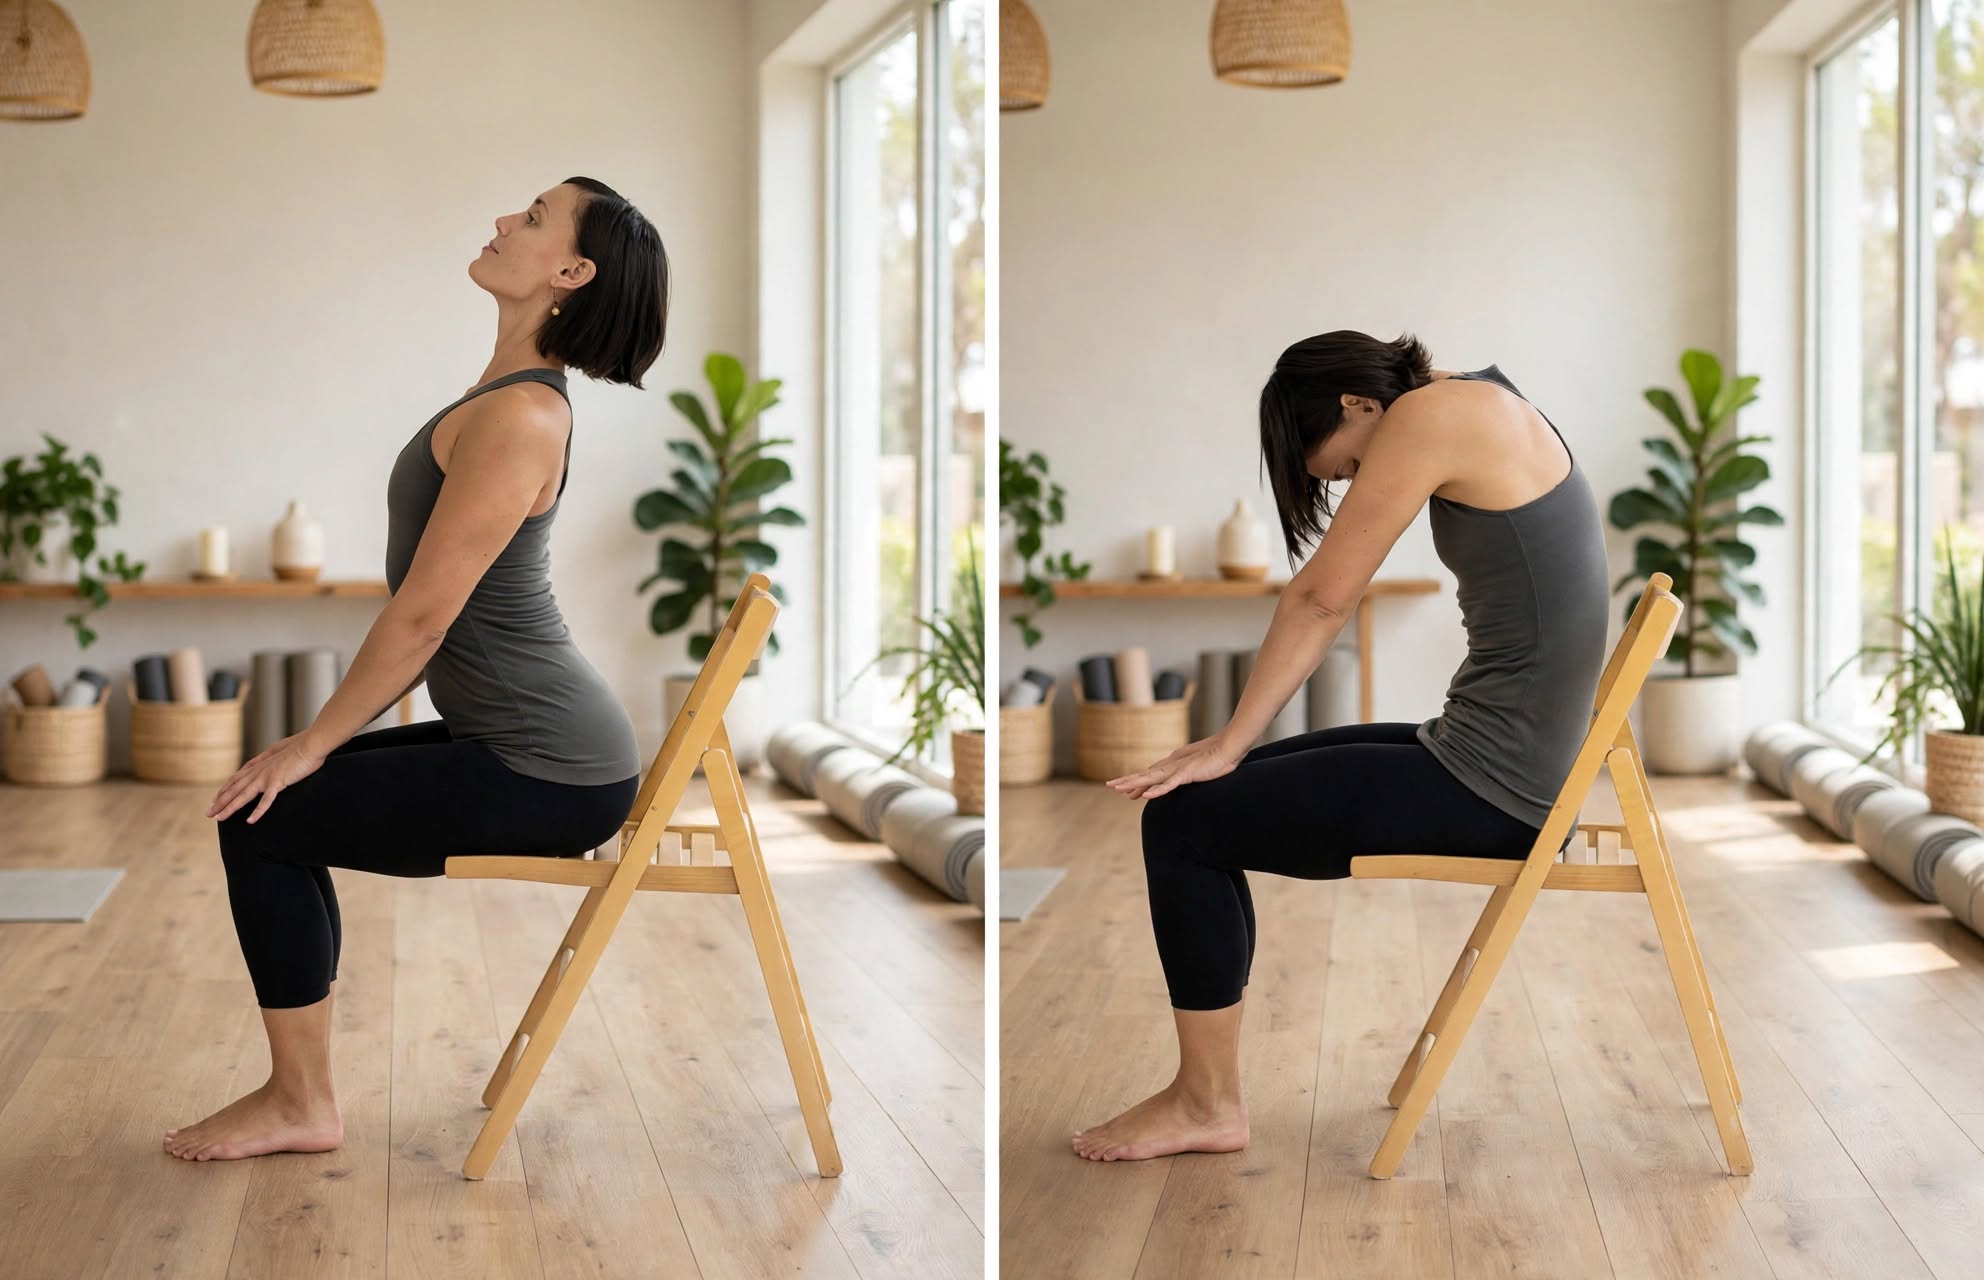
If you sit for most of your day, you already know the feeling. By mid-afternoon your shoulders creep up toward your ears, your lower back feels tight, and your neck complains every time you turn your head. The good news is that you don’t need a yoga mat, special clothes, or a free hour to feel better. You need a chair and about three minutes.
The seated cat cow pose is one of the simplest movements in chair yoga, and honestly one of the most useful. In this article I’ll explain what it is, how to do it step by step, what it does for your body, which mistakes to avoid, and a few personal tips that make a real difference. I’ll also show you how it fits into a routine of chair yoga for back pain, because that’s the reason most people find this movement in the first place.
What Is the Seated Cat Cow Pose?
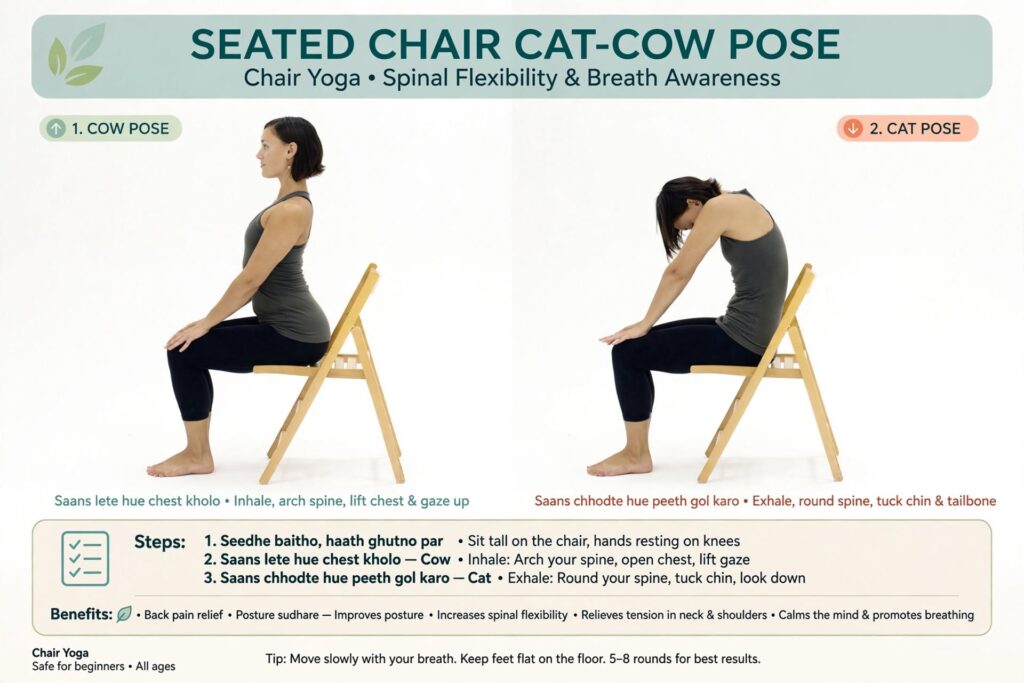
Cat cow comes from traditional floor yoga, where you move on your hands and knees. You round your spine like a scared cat, then arch it the other way like a cow with a dipped back. The seated cat cow pose takes the same idea and puts it on a chair. You stay upright, your hands rest on your knees, and your spine moves forward and backward in a slow wave.
Because you’re sitting, there’s no pressure on your wrists or knees. That makes it a great choice for beginners, older adults, office workers, and anyone who is getting back into movement after a long break. If you can sit, you can do this.
The movement is simple, but it’s not trivial. Your spine is made of 24 moveable bones, and most of us only use a small part of that range during the day. Sitting at a desk locks the spine in one shape, usually a slight slouch. Cat cow reminds each section of your back what movement feels like.
Why Your Spine Loves This Movement
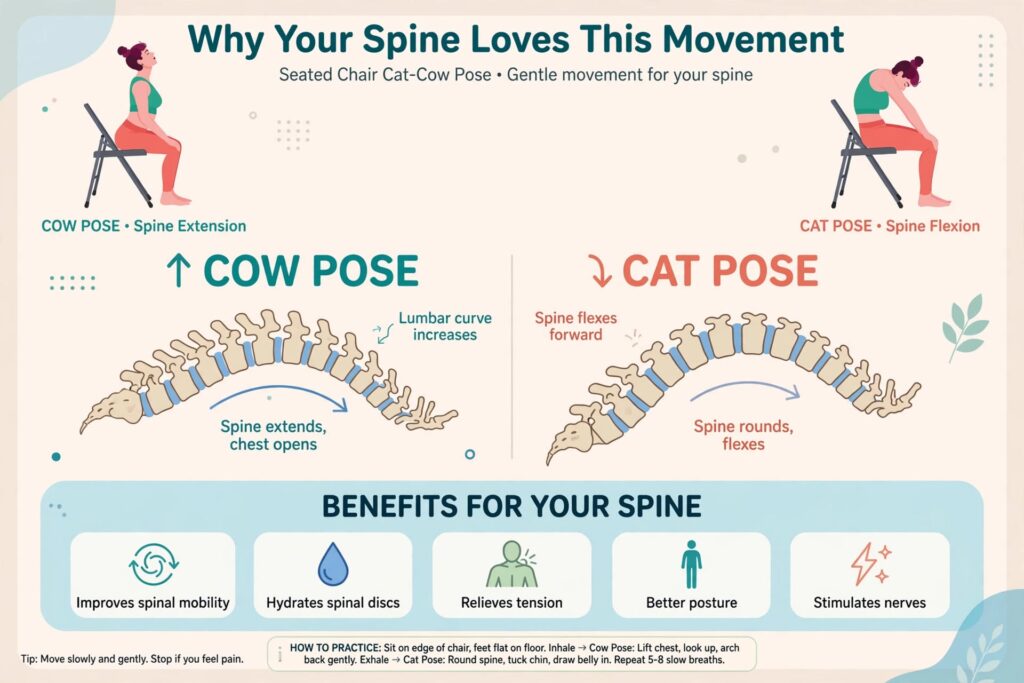
Think of your spine like a bicycle chain. If you never move it, it gets stiff and rusty. A little movement every day keeps everything running smoothly.
When you round your back (the cat part), you stretch the muscles of the upper back and between your shoulder blades. When you arch (the cow part), you open the chest and gently work the muscles along the spine. Moving between the two shapes also helps the discs between your vertebrae take in fluid, which is how they stay healthy, since they don’t get a direct blood supply of their own.
Add slow breathing and you get a bonus. Your belly and ribs move freely, your breath gets deeper, and your nervous system settles down. Many people say they feel calmer after just five rounds. That’s why the seated cat cow pose is so often taught to beginners, and why it keeps coming up in chair yoga for back pain programs.
Key Benefits of This Chair Movement
Here’s what regular practice of the seated cat cow pose can do for you:
- Eases stiffness in the back and neck. Even a few rounds can reduce that “stuck” feeling after long sitting.
- Improves posture awareness. You start to notice when you’re slouching, and you correct it faster.
- Opens the chest and shoulders. Helpful if you spend hours on a laptop or phone.
- Supports better breathing. Moving with your breath trains you to breathe more fully.
- Calms the mind. The slow rhythm gives your brain a short break.
- Safe and low impact. No jumping, no balancing, no floor work.
It won’t cure a medical problem, and I don’t want to promise that. But as a daily habit, it’s one of the easiest forms of chair yoga for back pain you can start today.
Set Up Your Chair First
A little preparation makes the seated cat cow pose much safer and more comfortable.
- Choose a sturdy chair without wheels. A rolling chair can slide when you shift your weight.
- Sit toward the front half of the seat so your back isn’t leaning on the backrest.
- Place your feet flat on the floor, about hip-width apart. Your knees should sit roughly above your ankles.
- Rest your palms on your thighs or knees.
- Sit tall, and let your shoulders drop away from your ears.
If your feet don’t reach the floor, put a thick book or a folded blanket under them. Stable feet make your whole body feel supported.
How to Do the Seated Cat Cow Pose, Step by Step
Take your time. This isn’t an exercise to rush.
Step 1: Start in a neutral position. Sit tall with a long spine. Take one deep breath in through your nose and let it go slowly.
Step 2: Begin the cow (arch). As you inhale, press your hands into your knees. Lift your chest forward and up, let your belly soften, and gently draw your shoulder blades toward each other. Your gaze can lift slightly, but keep your neck long. Don’t throw your head back.
Step 3: Move into the cat (round). As you exhale, round your spine like a gentle C. Let your chin move toward your chest, press your hands into your knees, and draw your belly button back toward your spine. Feel the space between your shoulder blades widen.
Step 4: Flow slowly. Keep moving between the two shapes, one breath for each movement. Inhale to arch, exhale to round. Do 8 to 10 rounds at a comfortable speed.
Step 5: Finish and rest. Return to a neutral spine, close your eyes if you like, and take two or three natural breaths. Notice how your back feels compared with before.
The whole thing takes about two to three minutes. If you’re new, start with five rounds and build up from there.
Getting the Breath Right
Breath is what turns this from a plain stretch into real yoga. Inhale through your nose as you arch and exhale through your nose (or softly through your mouth) as you round. Try to make each breath last about four seconds. If you feel dizzy, stop, slow down, and breathe normally for a bit.
A trick that helps: place one hand on your belly. You should feel your belly expand as you arch and draw in as you round. If it doesn’t, you’re probably moving your shoulders instead of your spine.
Common Mistakes to Avoid
Most problems come from rushing or forcing the movement. Watch out for these:
- Moving too fast. Quick, jerky movement means you miss most of the benefit.
- Throwing the head back. The arch should start from your chest, not your neck. Keep the back of your neck long.
- Shrugging the shoulders. If your shoulders climb up, drop them down before every inhale.
- Leaning on the backrest. You need space to move, so sit forward.
- Forcing the range. More isn’t better. Go only as far as feels comfortable, never into pain.
- Holding the breath. If you stop breathing, you’re pushing too hard.
Personal Tips That Make It Feel Better
These are small things that matter more than they sound.
Start the movement from your tailbone. Instead of thinking about your shoulders, imagine your tailbone tilting back for the arch and tucking under for the round. When the movement begins low and travels up the spine, it feels much smoother, and it’s far kinder to the lower back.
Keep your eyes soft. Staring at a screen while you move makes you tense. Look at a point on the wall, or simply close your eyes.
Tie it to a habit you already have. Do it right after a phone call, before you open your laptop in the morning, or after your tea. Linking it to something you already do means you won’t forget.
Move before the pain, not after. Don’t wait for your back to complain. A short session every two hours works better than one long session at night.
Pair it with water. Keep a glass nearby and drink after each round. It sounds silly, but it builds two good habits at once.
Be kind to bad days. Some days your spine feels like a rusty gate. On those days do three slow rounds and be happy with that.
Modifications for Different Needs
Everyone’s body is different, so adjust the seated cat cow pose as needed.
- If you have a sensitive neck: Keep your chin level in both shapes and skip the head movement altogether.
- If your wrists or shoulders are tight: Rest your hands lightly on your thighs instead of pressing into your knees.
- If balance is a concern: Sit with your back close to a wall, or choose a chair with arms.
- If you want more challenge: Slow each breath down to six seconds and add three extra rounds.
- If you work at a standing desk: You can do a similar movement standing with your hands on the desk, though the seated version is gentler.
Using It as Part of Chair Yoga for Back Pain
Many people come to chair yoga for back pain, and cat cow is usually the first movement I suggest. It warms the spine gently and prepares you for deeper stretches. A simple five-minute routine might look like this:
- Cat cow, 8 rounds
- Seated side bend, 3 breaths on each side
- Seated twist, 3 breaths on each side
- Forward fold over your thighs, 5 slow breaths
- Shoulder rolls, 5 forward and 5 backward
Do the routine once in the morning and once in the afternoon. After a week or two, many people notice they’re sitting a little taller and their back isn’t as stiff by evening.
A quick note of honesty: chair yoga for back pain works best as part of a bigger picture. Good sleep, regular walking, and a decent chair setup all matter. If your pain is sharp, spreads down the leg, or has lasted more than a few weeks, please talk to a doctor or physiotherapist before you start.
Who Should Be Careful
Chair yoga for back pain is gentle, but a few situations need a professional’s advice first:
- Recent spine surgery or a diagnosed disc problem
- Severe osteoporosis
- Unexplained or sharp pain
- Dizziness or low blood pressure
- Pregnancy complications
Stop right away if you feel pain, numbness, or tingling. Yoga should feel like a stretch, never like an injury.
How Often Should You Practice?
For most people, two to three short sessions a day is plenty. Five to ten rounds each time is enough. Consistency matters more than length. Three minutes every day beats thirty minutes once a week.
Quick FAQ
Can I do the seated cat cow pose in the office? Yes. It’s quiet, takes no extra space, and nobody will notice.
Will it fix my posture? It builds awareness and mobility, but posture also depends on strength and daily habits.
Is chair yoga for back pain suitable for seniors? Generally yes, and this movement is often included in senior chair yoga classes. Go slowly, and check with a doctor if you have health conditions.
What time of day is best? Any time works. Morning to wake up the spine, afternoon to fight the desk slump, or evening to unwind.
Final Thoughts
You don’t need a perfect pose or a perfect setup. You need a chair, a few breaths, and the willingness to move a little. Start today with five slow rounds of the seated cat cow pose, notice how you feel, and build from there. Your spine has carried you through a long day of sitting. Three minutes of gentle movement is a small way to say thank you.
1 thought on “Seated Cat Cow Pose: A Gentle Chair Yoga Move to Loosen a Stiff Spine”